Making a Lighthouse Plugin work with Lighthouse CI
Learn how to do your custom page audits in GitHub Actions with Lighthouse CI


Update: This blogpost was written when there was no documentation yet about Lighthouse Plugins in Lighthouse CI. Also the official Lighthouse CI Github Action didn't work with Lighthouse Plugins without hacks. However: this is fixed now (Lighthouse CI docs, Lighthouse CI Action docs) \0/. The blogpost is updated and is still a how-to for creating a Lighthouse Plugin and add it to Lighthouse CI in GitHub Actions.
During Chrome Dev Summit 2019, the Google Chrome team announced Lighthouse CI & Lighthouse Plugins. My first thought, after these announcements, was: this could fix a problem I have when building websites! The problem I have is: Lighthouse doesn’t cover all the things I like to check on a webpage. Besides Lighthouse I use the Twitter Card Validator, Facebook Debugger, a favicon checker, and the Structured Data testing tool. Tools for making sure websites I work on, like the Dutch State Lottery, also look good on other channels. Those tools can only be run on production and are often forgotten in practice, though. Lighthouse CI runs before production and is an automated task. This seems like a solution!
For those who don’t know what Lighthouse CI & Lighthouse Plugins are: Lighthouse CI is the successor of the now deprecated Lighthouse bot. Lighthouse CI is a set of commands for running Lighthouse in a continuous integration environment. This makes it even easier to incorporate Lighthouse in your workflow on GitHub when building new features. For example, when you create a new pull request, the Lighthouse audits for your website run directly on GitHub Actions, so you can see if your changes have an impact on the quality of your website.
How awesome would it be if I could extend Lighthouse with Plugins for use-cases I now check with other tools?! And this all runs early in the process: in a pull request on GitHub.
So far the excitement, because combining Lighthouse CI & Lighthouse Plugins on GitHub Actions isn’t documented (yet). However, Lighthouse CI uses Lighthouse where plugins are possible. So, in theory, this should be possible. And I’m glad, it is! Let’s take a look at how this is possible.
This example will make use of GitHub Actions, but this setup will probably also work with other CI tools.
Writing your Lighthouse Plugin
The first step in the setup is getting a Lighthouse Plugin. You can use an existing plugin (there are some plugins available made by other Lighthouse users), but you can also write your own plugin. There is documentation about writing a Lighthouse Plugin available on the Lighthouse GitHub repo. I first tested the roundtrip with Lighthouse CI on GitHub with an existing plugin to see if I got it working.
For this explanation, I created my own plugin. This plugin checks if some metadata is available for showing a web page enriched on Twitter, basically a part of the functionality of the Twitter Card Validator. See below for what the plugin looks like. The full code can be found on GitHub.
{
  "name": "lighthouse-plugin-social-sharing",
  "main": "src/plugin.js",
  "files": [
    "src"
  ],
  "peerDependencies": {
    "lighthouse": "^5.0.0"
  }
}module.exports = {
audits: [
{ path: 'lighthouse-plugin-social-sharing/src/audits/twitter/card.js' },
{ path: 'lighthouse-plugin-social-sharing/src/audits/twitter/manual-check.js' }
],
category: {
title: 'Social sharing',
description: 'These checks validate if meta tags are provided for displaying your website on social channel in a more engaging way.',
auditRefs: [
{ id: 'twitter-card', weight: 1, group: 'twitter' },
{ id: 'twitter-manual-check', weight: 0, group: 'twitter' },
],
},
groups: {
twitter: {
title: 'Twitter'
}
}
};Integrating your Lighthouse Plugin in Lighthouse CI
At the time of writing, there is only one option for integrating a Lighthouse Plugin in Lighthouse CI: you have to add it in a Lighthouse config file. In the future, it might also be possible via command-line arguments. See this GitHub issue.
A Lighthouse Plugin is a node module, published on npm. So publish it first before adding it to your config. I named my plugin ‘lighthouse-plugin-social-sharing’.
- Install the plugin as a dependency in your project, for example:
{
  "name": "lighthouse-plugin-sample-project",
  "version": "1.0.0",
  "devDependencies": {
    "lighthouse-plugin-social-sharing": "0.0.1"
  }
}2. Create a Lighthouse config file in your project and add the plugin.
{
  "ci": {
    "collect": {
      "settings": {
        "plugins": [
          "lighthouse-plugin-social-sharing"
        ]
      }
    }
  }
}You can already test on your local machine if Lighthouse CI works with your Lighthouse Plugin. This can be done with the following steps:
- Install Lighthouse CI
npm install -g @lhci/cli@0.3.x - Run a test on a webpage with Lighthouse CI
lhci collect --url=[your-url] --config=lighthouserc.json - View the Lighthouse report
lhci open
The result is your custom plugin visible as an extra audit in the Lighthouse report.

Integrating Lighthouse CI with a Lighthouse Plugin in GitHub Actions
The last step is to integrate it into your workflow on GitHub with GitHub Actions.
The Google Chrome team worked together with the Treo team for creating a GitHub Action with Lighthouse CI: Lighthouse CI Action. For convenience, we will use that action for now, although some hacks are still needed to get a Lighthouse Plugin actually working with it. Hopefully, this won’t be necessary anymore in the future.
For running the Lighthouse CI Action, you need to create a workflow file (read more about workflow in the Github Actions docs). Below you can find an implementation with the hacks to get the Lighthouse Plugin working. The code can also be found on this sample project’s GitHub.
name: Lighthouse Audit
on: push
jobs:
  lighthouse:
    runs-on: ubuntu-latest
    steps:
      - uses: actions/checkout@v1 # checkout this repo, so you can run an 'npm install'
      - run: npm install # needed to install your Lighthouse Plugin
      - name: Audit URLs using Lighthouse
        uses: treosh/lighthouse-ci-action@master
        with:
          urls: |
            https://lighthouse-plugin-sample-project.glitch.me/
          configPath: ./lighthouserc.json
      - name: Save results
        uses: actions/upload-artifact@v1
        with:
          name: lighthouse-results
path: '.lighthouseci' # This will save the Lighthouse results as .json filesWhen you push this file, the Lighthouse CI Action should run in your GitHub repository and be visible in the Actions tab.
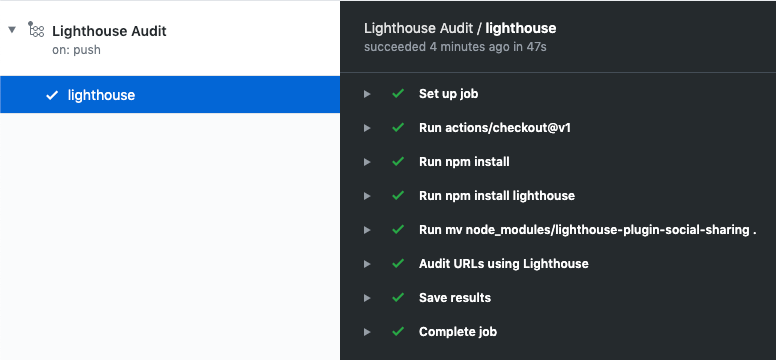
On the detail view of an action, you can download the artifacts that contain the Lighthouse report(s). These can be viewed with the Lighthouse Report Viewer, with the Lighthouse Plugins visible! An example of a run action can be found on the sample project's GitHub Actions tab.
Of course this can be even nicer if you upload the reports to your own server for diffs with the master branch for example. Read more about storing reports in the Lighthouse CI repository.
Combining Lighthouse CI & Lighthouse Plugins looks promising to me, so definitely give it a try! But I sure hope the hacks aren’t needed anymore in the future!
When creating the Social Sharing plugin, I encountered missing information in Lighthouse that is needed for the Twitter Card Validator case to make a good plugin. When this is released in Lighthouse, I can continue building this plugin and test it for a longer period in one of our projects at Q42.
I’m looking forward seeing the new Lighthouse Plugins from everyone!
Do check out our other tech posts as well: https://engineering.q42.nl.