Expanding visual search for online art collections
Enhancing art discovery by applying AI on Rijksmuseum's Collection Online


Ever wanted to find artworks containing a specific object? Like a particular vase, animal, or architectural element across an art collection? I made this a reality by combining two machine learning models during my graduation research project for Q42 and University of Applied Sciences Windesheim.
First off, what did I actually accomplish? I built two main things in this prototype. I first created a visual search prototype that lets you browse random artworks and select any piece to find similar ones. Just like the visual search features you might know from Pinterest or Google Photos, but now tailored for the Rijksmuseum collection.
In the same prototype I also added segmented search for some 17.000 artworks. For these artworks it's now possible to select a segment (small piece) and do a visual search based on that segment.
The project emerged from the Rijksmuseum Collection Online backlog. While visitors could already use text-to-image search using the Art Explorer, the option to select an artwork or a detail and find similar visuals across the collection remained to be explored.
My research aimed to create a working prototype showcasing the possibility of integrating regular image-to-image search and segmented search into the Rijksmuseum Collection Online landscape. The outcome of the research informed the upcoming visual search implementation planned for 2025–2026. Cool right? Let's dive into how this prototype was brought to life.
Data
Well, first off, the Rijksmuseum stores a large online collection with more than 800.000 artworks. This dataset consists of high-quality images and metadata of each artwork in the collection. Let’s explore the data to know what we are dealing with.
Micrio
For image storage and delivery, I used Micrio, a Q42 venture that offers two key services for my project. Its IIIF service allows me to fetch images in various dimensions and formats as needed during processing. In the prototype, the Micrio Viewer provides an optimised way for users to explore high-definition artwork details without requiring excessive computing power or bandwidth. Micrio is also used for the actual Collection Online website.
The Collection Online team offered me an export that included ObjectNumber from the Rijksmuseum collection object, with a Micrio Id attached to it. Based on this dataset it became possible to easily fetch images for an art object. Below you can see a preview of the content of the dataset.
| ObjectNumber | PreferredMicrioImageId | Width | Height |
|---|---|---|---|
| AK-BR-324 | YlIVA | 6483 | 4679 |
| AK-BR-325 | VDxEs | 5278 | 6301 |
| AK-BR-367 | IsTeU | 3336 | 2652 |
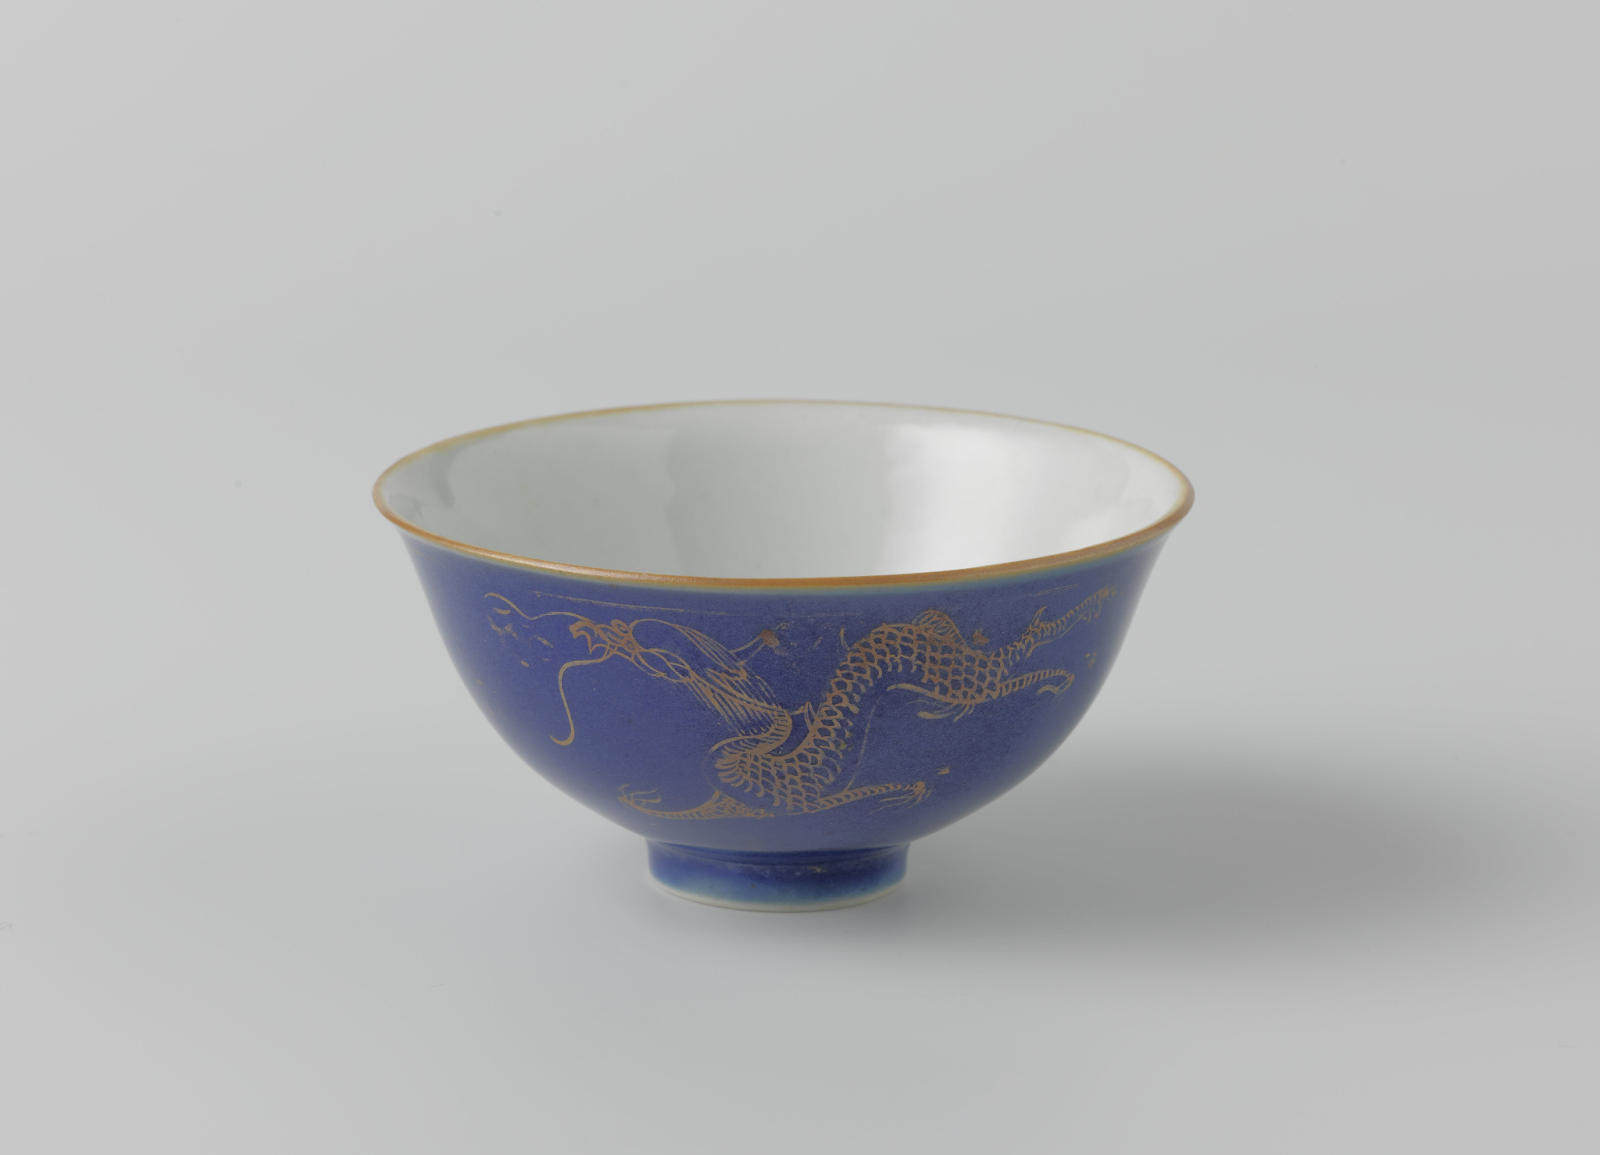
By injecting the PreferredMicrioImageId into a URL like https://iiif.micr.io/YlIVA/full/max/0/default.png. The IIIF Micrio API will provide the image that is shown below.
Metadata
Complementing the image data, the Rijksmuseum's comprehensive metadata gave me valuable context for the artworks. Although I only used basic metadata elements to display information on the prototype interface, this data helped me better understand the collection during my research phases.
# Path to the csv
file_path_rijksdata_csv = "data/202001-rma-csv-collection.csv"

# Load the csv
rijksData_df = pd.read_csv(file_path_rijksdata_csv)

# Show the first 3 records to get a grip of the data format
rijksData_df.head(3)
For the metadata I used the 202020-rma-csv-collection.zip metadata dump that is publicly available via data.rijksmuseum.nl.
| Inventory Number | Title | Type | Creator | Year |
|---|---|---|---|---|
| AK-BR-324 | Bell-shaped bowl with bleu poudré, dragons and pearls | Bowl | anonymous | 1800 |
| AK-BR-325 | Egg-shaped vase with a red glaze | Vase | anonymous | 1800 |
| AK-BR-367 | Round box with gold lacquer | Box | unknown | 1775 |
Models
After it became clear what data I had access to, I needed to think about what ML models would be relevant for the project.
For visual search I decided to go for image embedding models. These models can "compress" an image into a vector, preserving information about the images, making it possible to be used in vector databases where a nearest neighbour search can be done, so I could search for similar images.
For the segmentation part of the project, I chose the Segment Anything Model from Meta as it's fairly new but a promising one. Besides, the AI team from Q42 wanted to see its capabilities on the Rijksmuseum collection researched.
Embedding models
So, as mentioned before I used two machine learning techniques in this prototype. Image embeddings models are the first one I will cover. It's the base for finding similar images in the database.
I decided to run a survey on RESNET-50, Jina-CLIP-v1, Google Vision Transformer and DINOv2 on the following metrics:
- Resemblance - How exactly do the results resemble the query image?
- Semantic similarity - Do the results contain similar objects / concepts as the query image?
- Usefulness - How useful are the results for art discovery?
Based on the outcomes of the survey and my own findings, I chose the DINOv2 model from Meta.
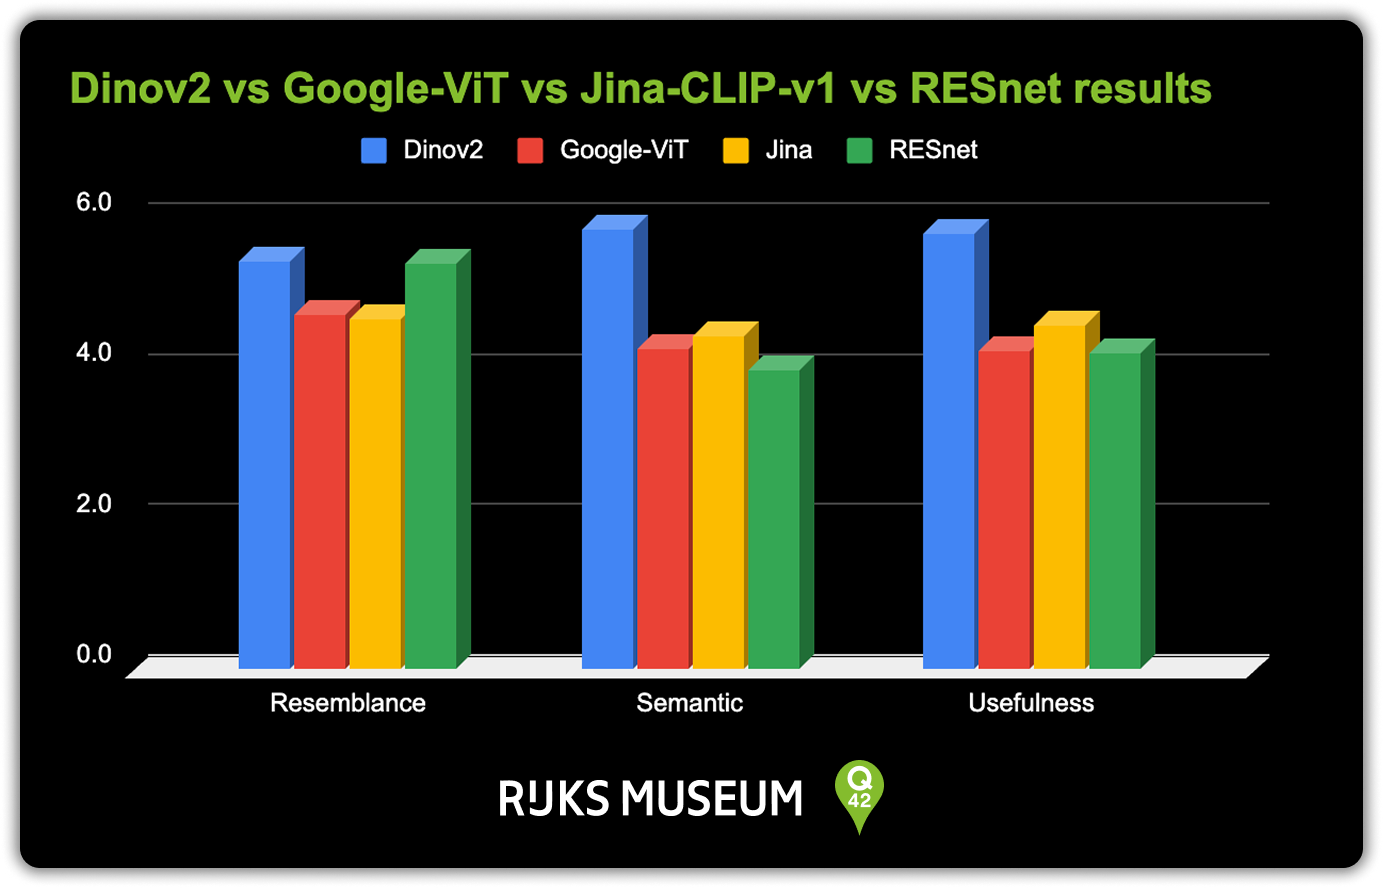
The survey results clearly showed that DINOv2 performed best across all areas. While the older RESNET-50 model surprisingly performed well on the resemblance metric, this did not translate to improved usefulness. This aligned with the development team's consensus at Q42 that finding semantically similar items was more valuable than visual resemblance alone.
To produce the embeddings for this survey and further on in the rest of the project, I created a pipeline for embedding the images and saving the embeddings.
To speed up the embedding process, I used Python’s asyncio library to run the pipeline in parallel. This allowed me to process hundreds of thousands of images in just a few hours instead of days. In the end, creating an image embedding using DINOv2 didn't use too much code. I wrote this class which I used to embed the images:
import torch
import torchvision.transforms as T
from PIL import Image
from .base_embedder import ImageEmbedder

class DINOv2Embedder(ImageEmbedder):
    def _load_model(self):
        model = torch.hub.load('facebookresearch/dinov2', 'dinov2_vitl14')
        return model.to(self.device).eval()

    def _load_processor(self):
        return T.Compose([
            T.Resize(256),
            T.CenterCrop(224),
            T.ToTensor(),
            T.Normalize(mean=[0.485, 0.456, 0.406], std=[0.229, 0.224, 0.225]),
        ])

    def _load_image(self, image_path):
        image = Image.open(image_path).convert('RGB')
        return self.processor(image).unsqueeze(0).to(self.device)

    def embed(self, image_path):
        with torch.no_grad():
            input_tensor = self._load_image(image_path)
            embedding = self.model(input_tensor)
        return embedding.cpu().numpy().flatten()
Storing the embeddings
Each time an image or segment was processed, its embedding, a high-dimensional vector, was stored in Qdrant, my vector database of choice. Qdrant is designed for exactly this purpose: storing and searching through massive collections of vectors with high performance. Rijksmuseum Collection Online uses Qdrant too.
Payload
Alongside each embedding, I attached a payload: a bundle of metadata that describes what the vector represents. This payload included the objectNumber to make it possible to search the vector database based on the objectNumber. Storing the payload was easy. Using the Qdrant API for the local Qdrant instance I was running, it only took a few lines of code to be able to store the generated payloads:
from qdrant_client import QdrantClient
from qdrant_client.http import models

QDRANT_HOST, QDRANT_PORT = "localhost", 6333
qdrant_client = QdrantClient(host=QDRANT_HOST, port=QDRANT_PORT)

async def process_batch(batch_df, embedder, collection_name, existing_ids):
    points = []
    for _, row in batch_df.iterrows():
        if row['ObjectNumber'] not in existing_ids:
            image_path = f"images/1024/{row['ObjectNumber']}.png"
            result = await process_image(image_path, row['ObjectNumber'], embedder)
            if result:
                points.append(
                    models.PointStruct(
                        id=get_unique_id(result['id']),
                        vector=result['embedding'],
                        payload={
                            "object_number": row['ObjectNumber']
                        }
                    )
                )

    if points:
        qdrant_client.upsert(collection_name=collection_name, points=points)
    return len(points)
Cosine similarity & nearest neighbour search
When we want to find similar artworks or details, we don’t need to generate a new embedding on the fly. Instead, because I included the objectNumbers in the payload, we can simply query Qdrant using the ID of the selected image. Qdrant retrieves the stored embedding, calculates cosine similarity to all other vectors, and returns the nearest neighbours (most visually or semantically similar results) in an instant.
We can also do this using the Qdrant API. First we query the vector that is associated with the object_number we are requesting and then we can use the find_nearest_neighbors function to find the nearest neighbours.
def get_vector_for_object(collection, object_number):
    results = qdrant_client.query_points(
        collection_name=collection,
        limit=1,
        query_filter=Filter(
            must=[FieldCondition(key="object_number", match=MatchValue(value=object_number))]
        ),
        with_payload=True,
        with_vectors=True
    )
    if results.points[0]:
        return results.points[0].vector
    return None

def find_nearest_neighbors(collection, vector, k=6):
    results = qdrant_client.search(
        collection_name=collection,
        query_vector=vector,
        limit=k+1,  # We ask for one extra because the object itself is also in the results
        with_payload=True
    )
    # We skip the first result because that is the object itself
    return [hit.payload for hit in results[1:]]
With this, the regular visual search part was proven possible. The next step in the process became to figure out how I could combine this technique with the Segment Anything Model (SAM) from Meta.
🇳🇱 👋 Hey Dutchies!
Even tussendoor... we zoeken nieuwe Q'ers!
Segment Anything Model meets art
The idea was that if visual search works for full sized images, cutting up an image and then applying the same method to the cutouts would improve the visual search and make it more targeted.
I wasn't familiar with SAM, so I started off with exploring what the model was about, how it worked, how well it performs on the Rijksmuseum collection and what tweaking options it offers.
The model has different methods to determine a segment. In general it works by placing a point on an image. Afterwards it will look from that point in which segment it belongs. For our use case I decided to use the SamAutomaticMaskGenerator class of the model. This class places x points on a grid over an image to automatically generate masks.

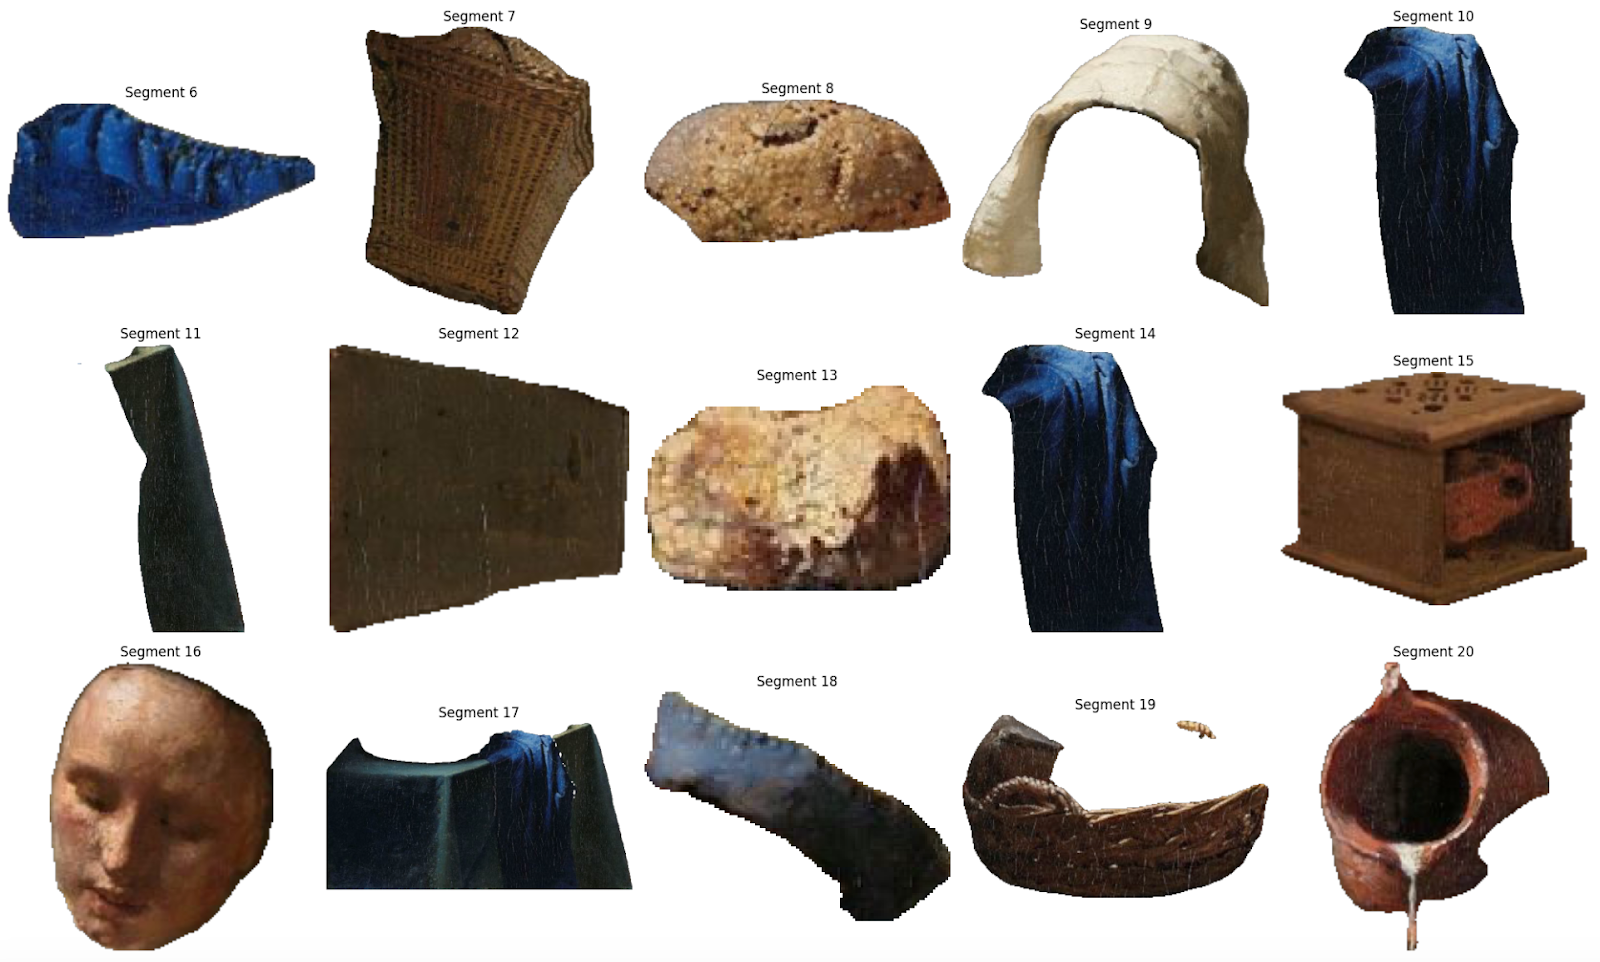
Applying this technique on the famous The Milkmaid by Vermeer gave the following result.
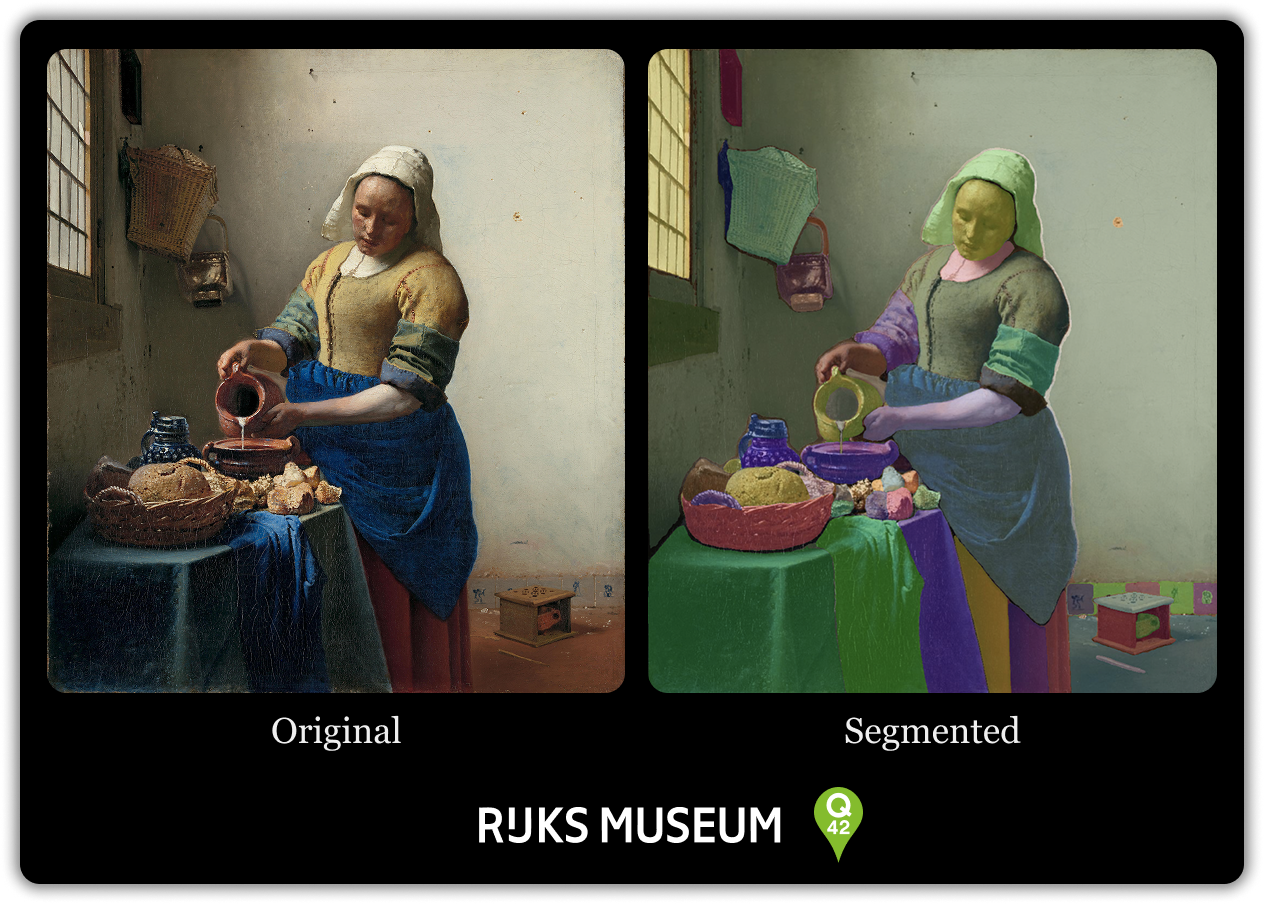
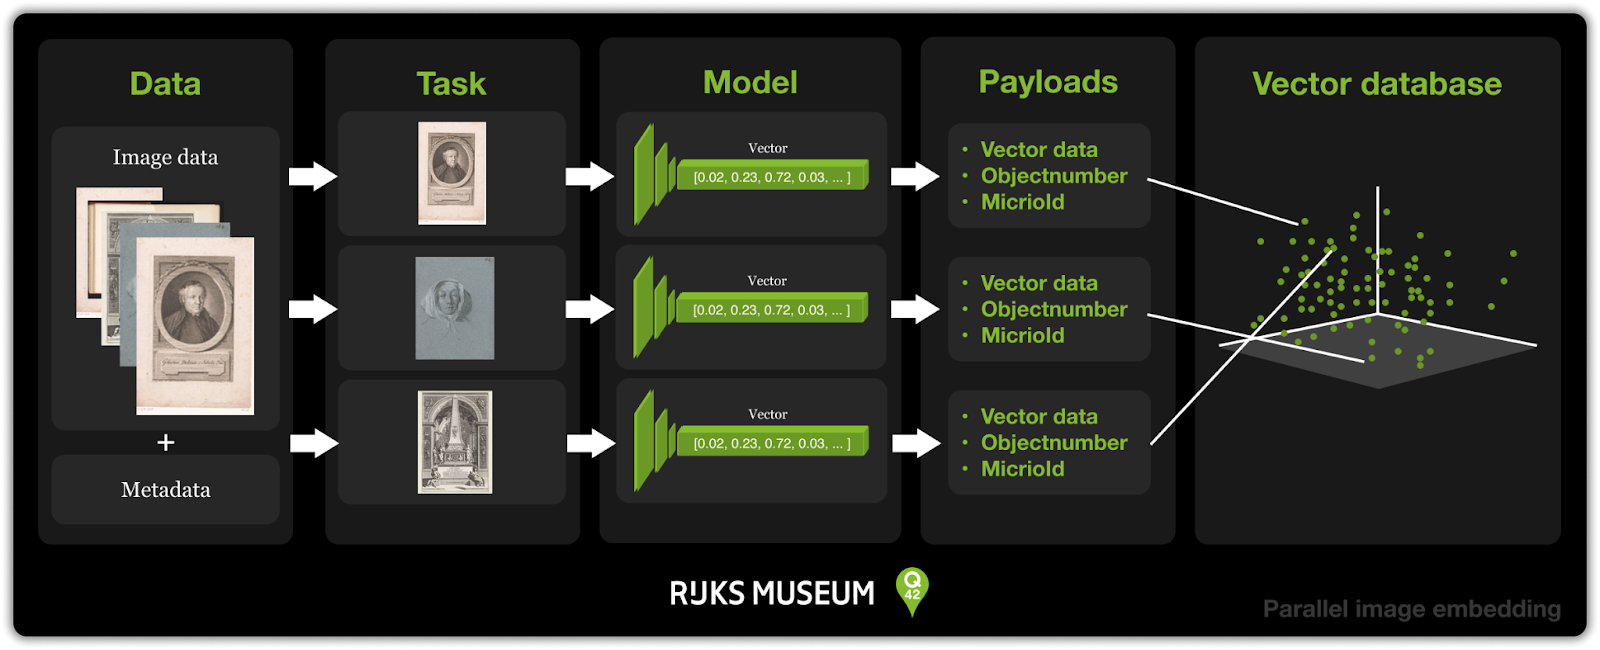
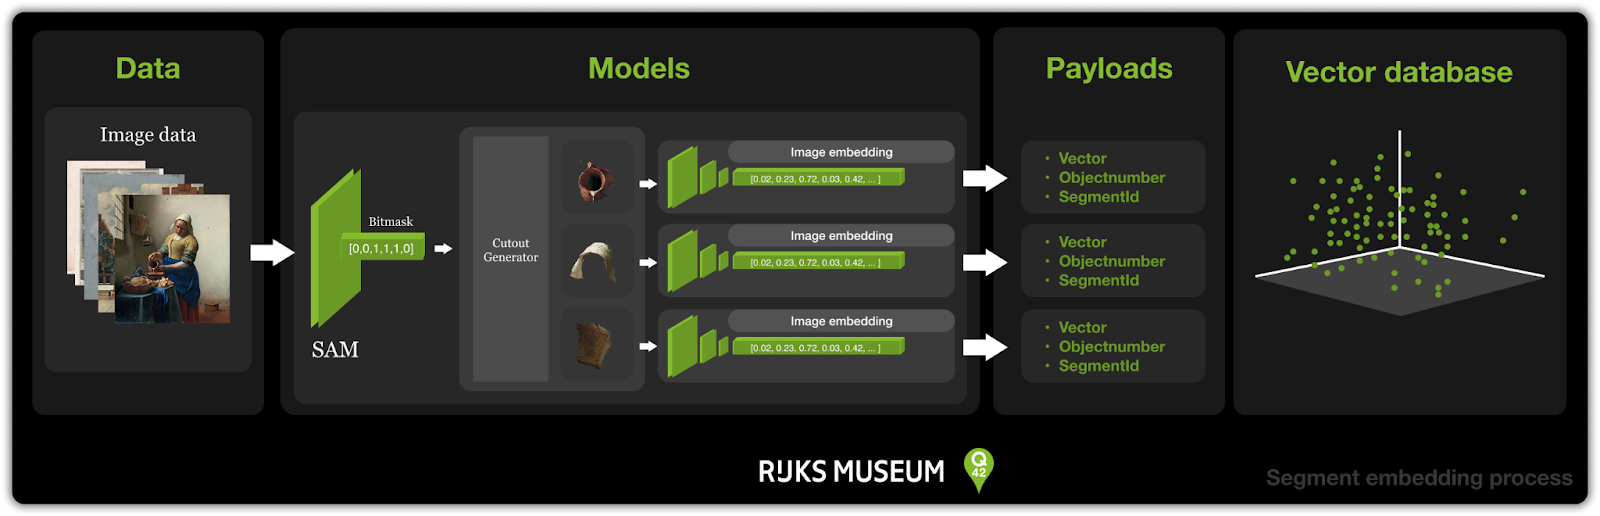
With this technique I could now integrate this in the embedding generation process. The segments you see above are visual representations of bitmasks generated by the Segment Anything Model. Using a bitmask makes it possible to make a cutout of an image. The idea was to use these cutouts to feed the image embedding model and perform image similarity search across image segments. The figure below shows how this works.

This is only for one segment in an artwork. The SamAutomaticMaskGenerator generates all the segments it can find for an artwork. Like the example below for the painting The Milkmaid by Vermeer.
The segmented visual search feature was implemented by creating cutouts from all segments generated by the SamAutomaticMaskGenerator and applying the same embedding method used for normal visual search. Given the high processing time and limited research timeframe, I selected a focused dataset. I selected all the paintings in the collection as they include the most searched art of the collection. I also selected random artworks to see if any connections between paintings and drawings or objects would come up in the detailed search. The dataset consists of 18,000 pieces.
Processing the entire collection with the current unoptimised workflow would require approximately 80 days using a single VM instance equipped with a modern Nvidia GPU. Which is way too long for a production deployment/pipeline. So for actual production and segmenting the entire dataset we need more optimisation to be done. But for now this will do.
Showcasing prototype
I built a small-scale prototype to experiment with these techniques and demonstrate their potential in a simplified website, inspired by the Rijksmuseum Collection Online. I used NuxtJS for the front-end to stay consistent with the original, and deployed it on Google Cloud Run to explore a modern and streamlined hosting setup.
This worked very well. It was easy to link to a branch in the repository, and produce a Docker container that was automatically deployed when a push was made to the branch. So a CI pipeline was set up in less than a day and still runs fine, at a very minimal cost.
I started replicating the masonry-grid that is present in the Rijksmuseum Collection Online by using Micrio and the .csv data file I used for filling the vector database. Luckily a npm package called vue-masonry-wall was available to make this process quite convenient. To be able to fetch the image from Micrio efficiently I used the NuxtImg component and applied a technique to fetch the image in different sizes. 40px as first load with a blur to make it quickly load a low quality placeholder and then a large sized image.
<!-- Blurred small image -->
<NuxtImg
    :src="smallImageUrl"
    :alt="item.title"
    class="w-full h-full object-cover absolute inset-0 transition-opacity duration-300 ease-in-out"
    :class="{ 'opacity-0': isHighResLoaded }"
    style="filter: blur(10px); transform: scale(1.1);"
    loading="eager"
/>
<!-- High-res image -->
<NuxtImg
    :src="highResImageUrl"
    :alt="item.title"
    class="w-full h-full object-cover transition-opacity duration-300 ease-in-out"
    :class="{ 'opacity-100': isHighResLoaded, 'opacity-0': !isHighResLoaded }"
    @load="onHighResLoad"
    loading="lazy"
/>
Object page visual search
With this in place I started making the detail page of an object. The object page has two versions: normal visual search and segmented search.
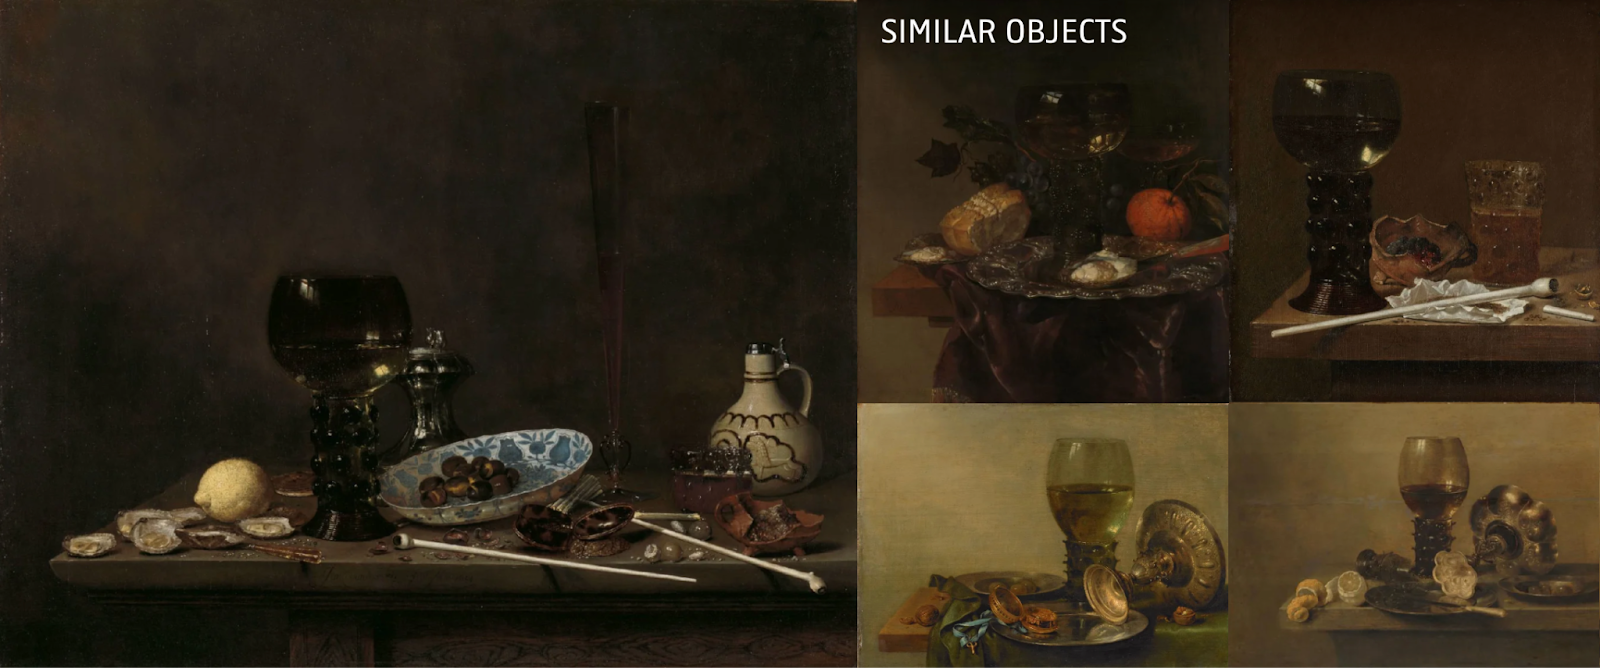
Normal visual search
The visual search mode follows design principles from Pinterest and Google Images, placing the selected artwork at the center with similar images displayed alongside it. I implemented this using the Micrio Viewer, which allows users to zoom in on artworks details while displaying a masonry grid of similar images on the right side.
To ensure reusability, I designed the MasonryGridItem component to generate URLs based on the micrioId. This allows the homepage to display random artworks while the object page shows images similar to the selected artwork.
Segmented search
For the 18.000 images I applied segmentation to, I had to come up with a neat way to show users segments are present in a painting, without overstimulating the user. After a discussion with designers from our sister company Fabrique, I came up with the idea to make a sort of glow effect with the cursor: lighting up the edges of nearby segments makes it feel like a discovery of what is present in the painting.
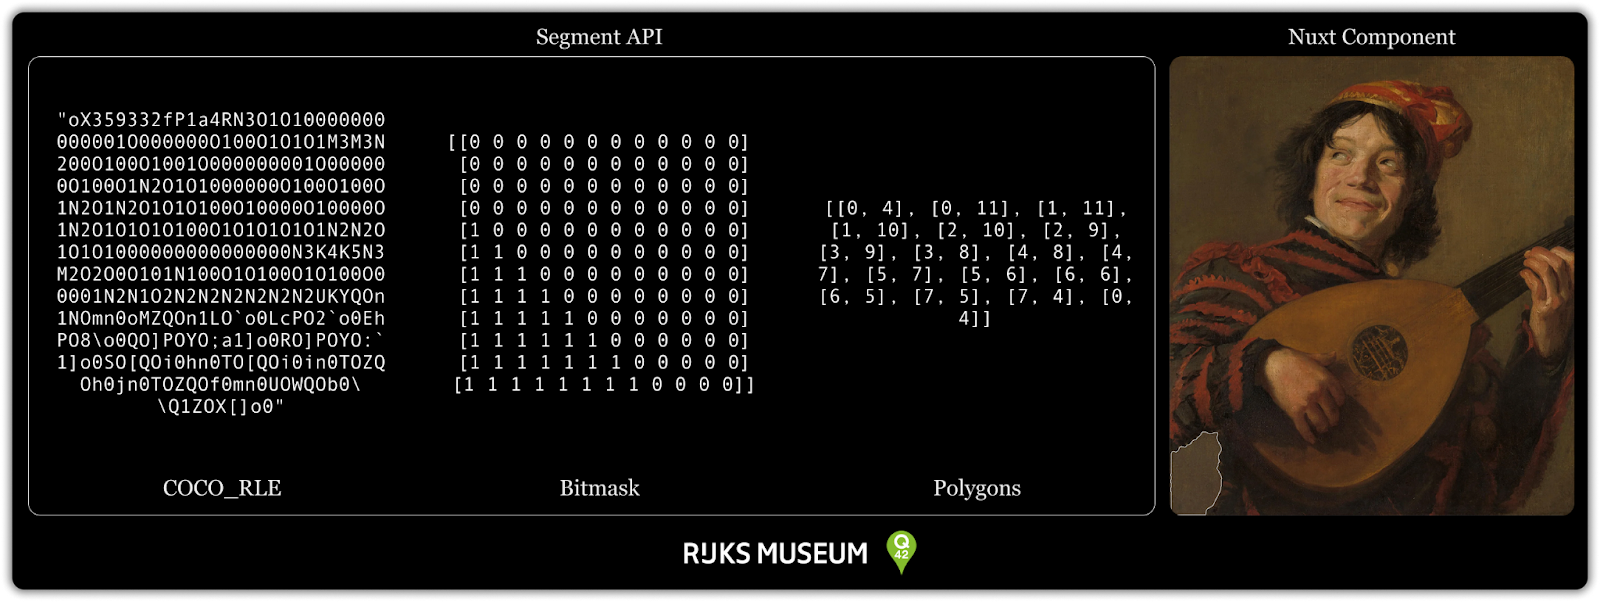
So, how did I do this? I had the segmented data stored, which was in COCO_RLE format for efficiency. Now, I needed to be able to show the segment in the browser and make sure they are clickable. The first thing that came to mind with those requirements was a svg path. Because they are clickable and can be shaped in any way we want.
So I needed to convert the COCO_RLE data into polygons. Luckily, Python has the imantics library that can convert bitmasks into polygons and the pycocotools library that can decode the COCO_RLE data into a bitmask. Following this route, I was able to make a function that converts the COCO_RLE data into polygons, using three lines of code.
from pycocotools import mask as mask_util
from imantics import Mask

def rle_to_polygon(rle):
        mask = mask_util.decode(rle)
        polygons = Mask(mask).polygons()
        return [poly.tolist() for poly in polygons.points]
Using the output from the Python API, I wrote a Nuxt Component that could generate a component that would overlay the segment over the image.
SegmentComponent.vue (renders a single segment’s polygons):
<template>
  <g v-if="segment">
    <polygon
      v-for="(poly, i) in segment.polygon"
      :key="i"
      :points="poly.map(([x, y]) => `${x},${y}`).join(' ')"
      stroke="#fff"
      stroke-width="2"
    />
  </g>
</template>
SegmentsViewer.vue (renders all segments using SegmentComponent)
<template>
  <svg :viewBox="`0 0 ${width} ${height}`" width="300" height="300">
    <SegmentComponent
      v-for="segment in segments"
      :key="segment.id"
      :segment="segment"
    />
  </svg>
</template>
I attached an event listener to each segment which, when clicked, triggers a call to the Qdrant vector database that returns the object numbers + the nearest neighbour segment. These segments could then be fetched from the segment store and be overlayed on the image using the SegmentComponent.vue component I made before.
Now that we have the artworks + the nearest neighbour segment of these artworks we can display the results in the MasonryGridItem component with a highlighted segment on the image.
This was, when I first saw it, quite the spectacle. Comparing normal visual search to the segmented search really shows the potential of the usage of segmentation in combination with image similarity search.
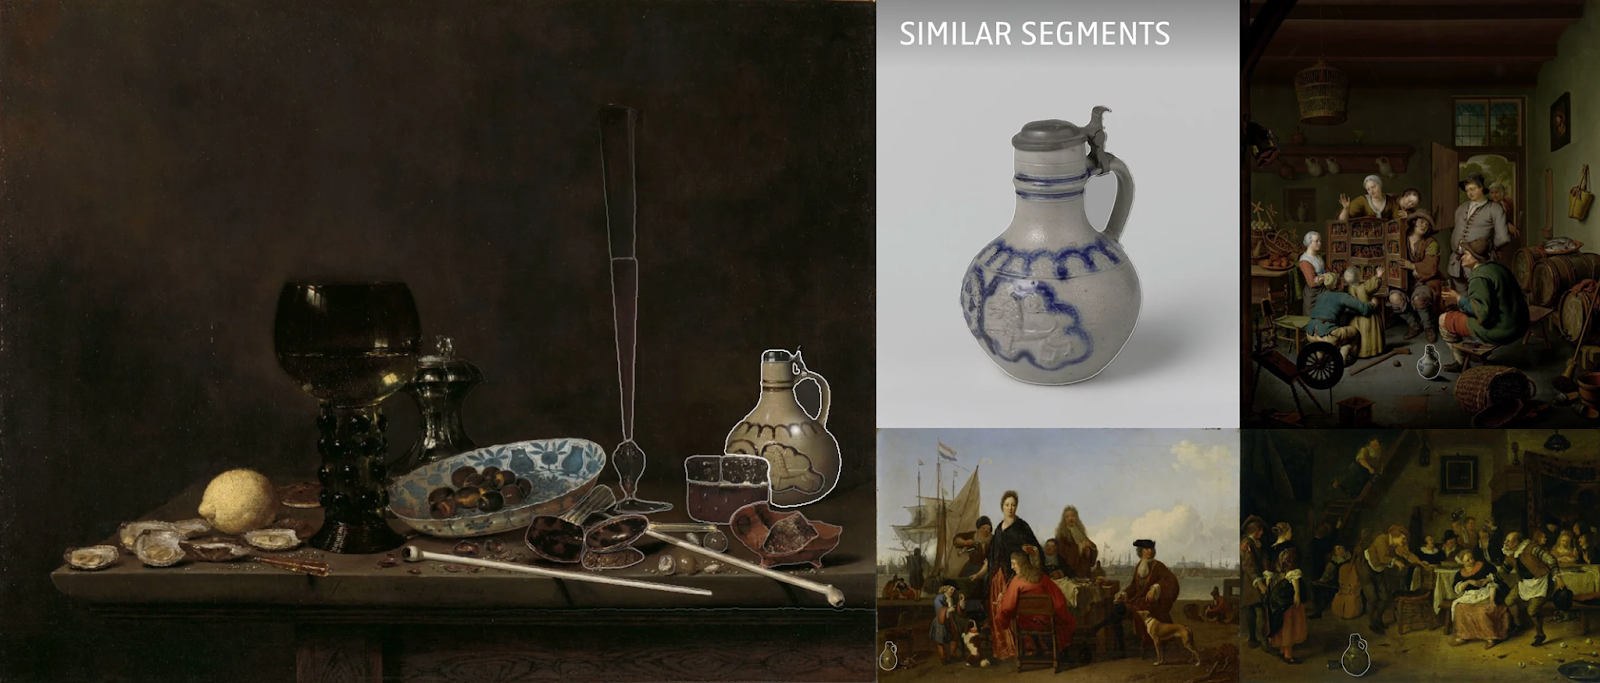
Using the segmented search, I found an almost identical match of the object in the painting. This proves this technique is able to create unknown connections in art collections.
Lessons learned
After this project I learned what possibilities lie in applying machine learning models in combination with strong foundations. The strong foundation of the Rijksmuseum Collection Online and Q42's work ethic allowed me to experiment and apply new techniques in a unique environment.
One other conclusion of the project was how simple the project was in the end. The toughest part of the project was getting up to speed and researching which model was the best fit for the project. Once the models were chosen, the implementation was fairly straightforward. And it gives me a lot of confidence that we at Q42 are able to apply new techniques in a production environment in a short amount of time.
It wasn't all smooth sailing, though. The Segment Anything Model was a bit of a challenge to work with. It was slow and required a lot of memory. We still run into the bottleneck of it taking 80 days to process all the 800.000 artworks of the Rijksmuseum collection. To do this for the whole collection, a different approach would be needed to generate the cutouts more efficiently.
Qdrant would also be a bottleneck for the whole collection. For now, working with some 800.000 points in the vector database wasn't expensive. Storing all the segments would however result in a database of 25 million points, which by their calculations would be very expensive.
In conclusion, I created a new way to search through an art collection by creating data connections using cutting-edge machine learning models. I am very humble to have been able to work on this project and I am proud of the results I achieved. I couldn’t have done it without Q42’s Collection Online teammates (and now colleagues) that supported me! It’s been rewarding to see how Q42’s approach creates space for purposeful, hands-on thesis projects that feed into real, widely used implementations.
Do you also love making impact with technical innovations like AI? Then do check out our job vacancies at werkenbij.q42.nl!